That being said, I decided to use a trick that I just saw posted on Chris Schwarz's Popular Woodworking Blog. It's a video of Mike Wenzloff showing a trick that his grandfather taught him. Basically, you intentionally overset the saw slightly and then wrap a piece of paper around the saw plate and squeeze the teeth in a smooth jawed vise, like a machinist vise. The teeth punch through the paper, but the paper doesn't compress on the plate above the teeth, leaving you with a consistent set on each side of the plate the thickness of the paper you used. Actually, at least in my case, a little more set than the thickness of the paper. I'm a little guy and I don't achieve quite the foot pounds of pressure that Mike does. ;)
I set the saw at home last night and then took it to work today where I have access to a machinist vise. I first used a sheet of legal paper and this left a little more set than I wanted. Then I switched to a sheet of newspaper and this was just the trick. The saw plate is .025 and the teeth after the vise squeeze mic out at .035. So .005 of set on either side. Right or wrong, this is what I was aiming for.

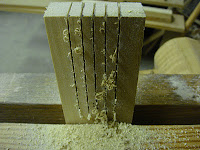
I put the saw to the test tonight. First I made some cheek cuts in a piece of 2 1/2" wide polar. Ate right through it like butter, nice and straight. Next I put a piece of poplar in the vise with the face toward me and tried to track some lines. The saw did well but turned slightly left on the last stroke or so on some but not all of the lines. Could've been my sawing skills, I'm not sure. What I do know is the saw cuts very quickly with no effort. That heavy brass back really propels it through the wood. 7 strokes and I was to the max depth of the saw. The cuts were a little ragged on the back side so I hit the saw with a couple strokes of the file with just a slight, maybe 5*, bit of fleam and made some more cuts. That little bit of fleam smoothed things out a bit. Less ragged on the back side and no loss of speed so I think I'll keep it at that.


Backside before fleam . . . . . . . . . . . . . Backside after fleam
I'm happy with the look and feel of this saw and based on the test cuts I think I'll be pleased with the performance as well. I really think that the Mike Wenzloff trick is a great thing for someone inexperienced with setting saw teeth. I highly recommend you try it. I know it really helped me. And if it's good enough for Mike Wenzloff. . . . . .
Next up, I'm finishing a 22" rip filed panel saw build. Wasn't I supposed to be starting on a blanket chest? Dang.
1 comment:
Get instant access to 16,000 woodworking plans.
Teds Woodworking has more than 16,000 woodworking blueprints with STEP-BY-STEP instructions, photos and blueprints to make each project very easy.
Post a Comment