Sunday, July 24, 2011

A New Saw. And Lots of First.

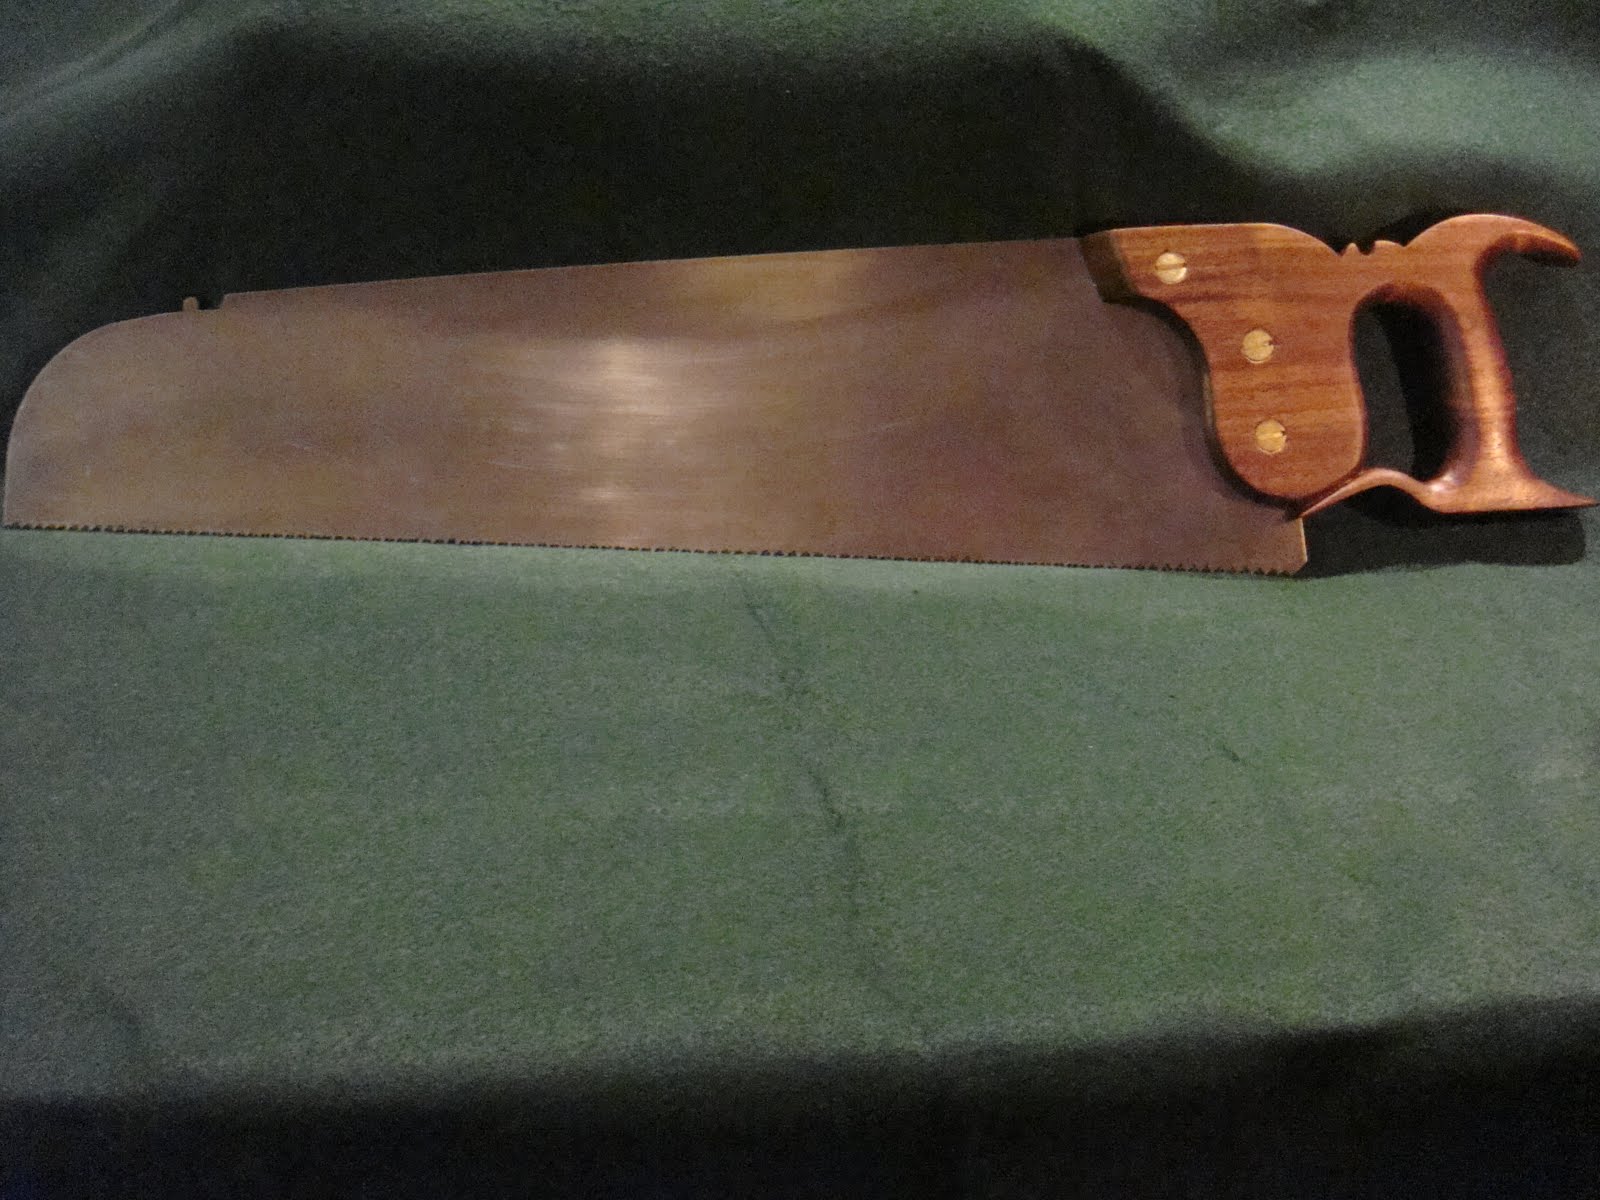
Well, I finally got this little panel saw done. I actually cut the saw plate out for this way back in September of last year. No sense rushing these things. This is the first panel saw that I've ever made and only the second saw overall. Consequently, it's also the first closed handled saw handle I've made and the first lambs tongue I've carved. All in all, I'm pretty happy with the way it turned out.

The saw plate started off as a piece of .032" 1095 spring steel from McMaster-Carr. I made a cardboard pattern of the shape and size I wanted the plate to be (pretty much like the Kenyon saw in the Seaton chest) and transferred this to the spring steel. Then I cut the plate to size on the metal shear at my work and then snipped around the toe til it was close and then filed to final shape. Don't ask me what I was thinking when I filed in the nib. Not the traditional placement I know. I'll just call it my signature look.
I brought the plate home and hand filed the teeth in the plate at 10 TPI using a pattern that I made on Exel, printing that out and using that as a guide for the tooth spacing.
That's pretty much where I left things until about a week ago when I got a wild hair and decided it was time to finish this thing. I drew up a pattern for the handle from looking at pictures of the saws in the Seaton chest on-line and in the book "The Tool Chest of Benjamin Seaton". The handle is black walnut that I had in the shop. I used my sash saw, and a coping saw to rough it out and the shaping was done with gouges, chisels, and rasp and sanded smooth with sand paper. The lambs tongue was just shaped with a v-gouge and a chisel. Wasn't nearly as tough as I thought it would be.

For hardware, I just used 1/4-20 straight slot counter sunk brass screws and brass square nuts. The square nuts were mortised into the right side of the handle and filed and sanded flush before the handle was finished. To finish the handle, I started off with two coats of Watco danish oil. This just left the wood looking dull and blah so I went and bought some Formby's low gloss tongue oil finish. Three coats of this, sanding with steel wool in between and a steel wool scuff up after the final coat to take some of the shine off and I called it done. While one of these coats was drying, I removed the bluing that was on the spring steel using citric acid. This was the first time I'd used this method and I was impressed with how quickly it worked. Less than 2 minutes and all the bluing was lifted right off.
I have lots to learn when it comes to saw sharpening, but I sharpened and set the teeth the best I know how and she cuts pretty good. Here's some test cuts. Nice thin kerf with no binding and a fairly smooth cut.

Hopefully as I learn more about sharpening she'll just cut smoother with every touch up.
I'm really finding myself enjoying the tool making aspect of this craft. There's nothing quite like using a tool that you actually made yourself. Now maybe I can use this new saw to cross cut some oak to size for the skirt on my still unfinished tool chest.
Oh, and I just got in some O-1 tool steel with which I'm going to try my hand at making some 18th century style square sided firmer chisels. Hopefully I'll get a chance to start on these soon.

Friday, July 8, 2011

Removing Rust with Vinegar-Mixed Results

A few weeks ago I went to a local estate sale and picked up 2 pair of Starrett dividers and a pair of Lufkin outside calipers. They were pretty rusty but the price was right, $15 for all three, and they were good brand name tools so I picked them up. You can never have enough dividers as far as I'm concerned. I'm starting to really see their usefulness in transferring measurements and laying out dovetails, among other uses. They're pretty cool tools and you can usually pick up vintage ones at a reasonable price. I could see myself developing a divider "problem" in the future.

Anyway, I was reading a post on WoodNet the other day where they were discussing de-rusting tools with citric acid. Vinegar was also mentioned as a good way to remove rust from tools. Hey, I have some rusty tools. AND Ihave some vinegar. Sounds like it's time for a little chemistry experiment. Well, I think I'd give myself a B- or a C in THIS Chem class. I'll let the pictures do the talking.

Before:

After:

As you can see, the 10" dividers didn't fare so well. Cleaned up nicely, but I guess I left them in a little too long. From what I understand, vinegar removes the rust, but also eats away the good metal if the tool is left to soak to long. Hopefully I can find a spring to replace the broken one on the 10" dividers.

Other than that little snafu though, I'd say I was impressed with the de-rusting ability of plain old white vinegar. Just a very little bit of wire brushing after a soak and things cleaned up almost like new. If you try this, just remember to immediately blow the tools off to remove the water that you rinse the tool with. I used an air compressor but you could use a hair dryer also. After I blew them off I sprayed them down with WD-40 for good measure. All and all, even with the little mishap, not bad for $15.

Wednesday, July 6, 2011

Just Piddling in the Shop


Well, it's back. Seems I've been stricken by another case of WWADD (Wood Workers Attention Deficit Disorder). With a tool chest sitting by my bench just begging to be finished and two panel saws and 4 back saws in various state of incompletion, it would only stand to reason that with the little bit of shop time I've had lately that I would work on building some wooden squares. I don't know why, other than the fact that I think they're pretty cool. Well, that and the fact that I've been watching Bob Rozaieski's pod-cast a lot lately and the episode on wooden squares caught my attention. If anyone reading this (IS anyone reading this?) hasn't been to Bob's site, do yourself a favor and check it out. He probably has the best, most informative blog going when it comes to hand tool woodworking. And his pod-cast are fantastic. He is doing the woodworking community a great service with his site.
Now, about these squares. The miter square is made from walnut with oak dowels pinning things together at a 45* angle. I cut the bridle joint with a small tenon saw and chiseled out the waste with a mortise chisel and then refined it by paring away at whichever side of the bottom of the bridle needed material removed to get my 45* angle. I established a true 45* angle on a test board by basically using this method. One more reason that dividers are one of the most valuable tools in the shop. When you strike these lines on your test board, I recommend that you use a knife rather than a pencil. A knife leaves a much more precise line.
The two try squared are made from beech with walnut dowels pegging things square. These squares started out as a piece of 1 3/4" x 1 3/4" beech, 18" long. I marked a line about 7/8" on the edge of the beech for the stock and ripped it with my D-8 rip saw, making sure when I marked it to orient things so that I'd wind up with quarter-sawn wood, much more stable. Then I took the remaining length of wood and ripped that in half for the blades. I planed the 7/8" stock down to about 3/4" and then made both edges square to the face and cut this into the lengths I needed for my two stocks; in this case 10" and 6". Next I cut the cheeks of a 1/4"wide bridle joint as I did with the miter square and then planed the blades to thickness to fit in the joint. Then it was a matter of squaring the blade to the stock using the same test board I'd used for the miter square and truing it to the 90* line that was established in the process of finding the 45* angle. If you're square to this line, flip the stock 180* so that the blade is on the other side of the line and if you're still square to the line, your square is actually square. At this point it's time to glue the blade into the bridle joint in the stock and let it set for a few hours. Then come back and drill holes for the dowels and glue those in. Once the glue set on these I pared away the excess with a sharp chisel and cut the decorative ends on the stock and the blade. This was traditional on craftsmen made 18th century squares. Made a few passes with a smooth plane to dress everything up nice and then I just finished with a few coats of danish oil.
I'm happy with the way these turned out and I think I'd like to make one more, maybe about a 4" or 5" version of the try square. The two I've made so far are a 15" and a 9" blade length. These are fun to make and really not that complicated and they'll serve you well for many years. And I always get so much more satisfaction using tools that I've made when I'm working on a project. Now I just need to find time to put them to use on some of these incomplete projects around the shop.

Sunday, June 19, 2011

What a Fathers Day haul!


Absolutely amazing generosity! I was floored when I unwrapped my Father's Day gift. Pleasantly so obviously. The details: A 4" Hamilton Marking Gauge in stunning African Blackwood, absolutely beautiful. The new Veritas Dual Marking Gauge, such a nice, heavy, quality tool. 3 Auriou Rasp; a 10" Cabinet Makers Rasp, grain 9; a 6" Modeller's Rasp, grain 15; and a 6" Round Rasp, grain 13. I had put the three rasp on my Christmas list ( never too early to start one of those :) ) so I was really surprised when all 3 showed up on Father's Day. Never tried a hand stitched rasp before but I can't wait to put them to use on some saw handles. Thank you so much to my wonderful wife (and to my girls, although I don't think they knew what they got me till I opened the box :) ).

Oh, and if all that wasn't enough, the day before Father's Day my step dad brought me a pristine Stanley 71 router plane with all 3 cutters, throat closing foot, depth gauge,
and fence. This thing looks like it MAY have been used once. A router plane had been on my short list for quite a while. Check. Looks like a type 13 best I can tell. Also included in his bag of goodies were a BUNCH of brace bits, including a 24, 22, 20, 18, and 17, and 5 expansion bits of various sizes, all in virtually new condition, and two old braces. Thanks David.

Needless to say, it was a great Father's Day. You guys sure know how to feed the tool addiction. :)

Friday, June 10, 2011

The Woodwrights School-Day 2


Sunday morning rolled around and it was time to make the now familiar drive into Pittsboro for another day at the Woodwrights School. I could get used to this. :) Today's class was Advance Dovetail Technique w/ Bill Anderson. I was a little concerned that the advance joinery class would be a little out of my league, but Bill is a great teacher and made it as easy as it could possibly be. Roy had basically said that he and Bills teaching style were night and day, actually he called it something else that was clever and witty but I can't remember now. Like Ren and Stimpy? No, that's not it. Oscar and Felix? Maybe, but I don't think so. Oh well, point is they're different. Which is kinda nice to be taught 2 different ways to accomplish the same task. Bill uses dividers to lay out his joints. A technique I had just used for the first time on my tool chest carcass.
The first thing we did was a through dovetail joint in a board that we put a 1/4" groove on the inside of both boards near the bottom of the pieces. I believe this was called a half lap dovetail. The trick was to be able to plow through grooves in both pieces and not have a little square of the end of the groove show up in the finished joint. Not too difficult of a joint. The dovetails are cut as normal through tails but on the tail with the groove in it, you remove the portion of the tail that has the groove. But before you remove that part of the tail, transfer your marks to your pin board. One thing that Bill teaches differently is to remove the waste between the tails and then transfer the marks to the pin board with a marking knife, versus Roy's method of marking with the saw before removing the waste. We cut the 3 tail sockets as normal but on the bottom one, you have to transfer the thickness of your trimmed down tail to the face of your pin board and be sure not to saw below that mark on that tail socket. Then it's just a matter of cleaning out the waste between the pins, putting them together, and wa-la, a hidden groove.
The next joint was called a half blind mitered dovetail joint. Although they were through dovetails. I guess the half blind refers to the miter at the top? This is a pretty cool joint and not as difficult as it looks. The first thing we did was determine how wide we wanted the mitered portion to be. This will be determined by the size of the profile you may want to put on this edge. Once you subtract this width from the tail board, you lay it out just as normal through dovetails. The only difference is when you saw them out, you will have the material you left at layout beside the one half pin socket. Don't saw the miter yet, mark your pins from your tail board first. Mark all your lines on the end of your pin board. Cut all your lines as normal EXCEPT the straight wall of the half pin where the extra material was left. This line has to be cut at a 45* angle, leaving the face side untouched and sawing down to the baseline on the inside. Now all that's left is to cut your 45* miters from the top edge down to the half pin on the pin board and to the pin socket on the tail board. Time for a test fit. Ahhh. So nice. :) Now we took them back apart and put a nice ogee detail on the top edge. Which is the point of doing the miter in the first place. One thing I learned, other than a really cool joint, is the joy of cutting a profile with a wooden moulding plane. It truly is pure bliss. I REALLY need to get a nice ogee plane.
We kind of ran short on time so we didn't get to execute the tapered sliding dovetail joint, but Bill explained it well enough that I'm confident I could make the joint.
I'm really glad I stayed for day 2. Bill is an excellent teacher and aside from learning some really cool joints, he also gave me a few tips that made me a much better sawyer. A very light, almost hovering touch when starting the saw and smooth, full saw plate length strokes with no downward pressure. Amazing how much smoother my cuts were after putting these tips to use. I've got my eye on a couple other of Bill's classes. The one day saw sharpening class and the 3 day make your jointer plane class. Although I'd rather make a try plane length. Hopefully some day.
As you can probably tell, I highly recommend that you treat yourself to a class or two at the Woodwrights School. It will be a great experience.

Thursday, June 9, 2011

My weekend at Roy's


Well, my day to attend the Woodwrights School finally arrived. I'd been looking forward to it for months. I was scheduled to take the "Dovetails, Mortise & Tenon w/Roy" class and was extremely excited to spend the day with one of my heroes.
I'd been working like crazy to get a tool chest built to transport some of my own tools to use during the class and it came down to the wire. I was installing the hinges for the lid and putting on handles the morning I was to leave for the class. But I got it done.
Roy's school is in a very quaint little town called Pittsboro in North Carolina. And it's really not a stretch to say it's Mayberry-like. I got into town about 7:30 that morning and since school wasn't supposed to start until 8:30, I had time to walk around a little. What a nice little downtown. And I do mean little. I had to chuckle to myself when I walked past the barber shop just a few doors down from Roy's and saw a man and his son getting haircuts with red and white striped barber smocks on in the old fashioned shop. Could've been my imagination, but I swear the barber looked a lot like Floyd Lawson.
I worked my way back to my car parked in front of the school and waited. About 8:15 I saw the familiar figure of Roy Underhill come around the corner and open up Disney World, er, I mean the school. Trying not to look too anxious and trying to give him a little time to get straight, I waited about 10 minutes to go in. I was first there so I introduced myself and asked if I could bring my chest in. Absolutely he said, so off I went to lug it out of the trunk. It's fairly heavy with tools in it. I worked my way to the back corner bench were there'd be room for the chest and prepared to settle in. Roy made my day when he came back to look at the chest and told me what a great job I'd done and how I didn't need to be in his class, and that I should be in Bill Anderson's advanced dovetail class the next day. He offered to switch my registration to that class. I told him thanks but I really wanted to take a class from him. I was on cloud nine from his little compliment and before class started I called my wife to tell her what he'd said about the chest and about the class tomorrow. Without me even asking, she suggested that I take Roy's class and stay for Bill's the following day also. What a woman!!! So my weekend just got a lot better before it really even started.
Roy's class was full, ten people, with woodworkers of various skill and experience. Time to get to work. Roy has a great way about him. He puts you at ease, explains things well, and makes the learning fun with his wit and humor. He is also extremely knowledgeable. Obviously about woodworking but about so many other things also. More on that in a minute. After a brief talk on safety it was time to get dovetailing. First up were through dovetails. The way we did things that day, at the request of a student, was Roy would explain a step, then we go do that step, then come back for an explanation of the next step and so on. Roy is what I would call more of a "feel" woodworker than an analytical, by the book guy. He doesn't care what the angle of the dovetail is, doesn't even care to find out most times. He just decides how may tails he wants on the tail board and goes from there. A 3/8" chisel determined the width of our pin sockets. Doesn't matter what size you use, the point is, make this measurement the width of a chisel you have. After laying out and cutting the tails, we marked the pin boards by placing them in the face vice, laying the kerfed tail board on top of the end of the pin board and placing the toe of the saw in the kerf of the tail and pulling back. Although I'd seen Roy use this method on TV before, it was the first time I'd tried it. After all was said and done I have to say, I liked it. We finished marking the pin boards, cut them with our dovetail saws, removed the bulk of the waste with coping saws and then chiseled to our base lines. Time for a test fit. Whew, not bad. First dovetail came out nice. Time for lunch.
We all had lunch together at the restaurant right next to the school. I can't think of the name right now to save my life but it was delicious. Great food, good service, and killer shakes served in an old fashioned glass with the extra brought to you in a stainless steel cup that the shake was made in. This brings me to what I was saying earlier about Roy being knowledgeable about so much. When I brought my tool chest in, I just had the rope handles going through holes I'd drilled in the cleats and tied in a knot. I told him I needed to learn how to braid rope to make a better looking handle. Well, he told me to bring some rope to lunch and right there in the restaurant he took the braided rope apart into 3 strands and showed me how to braid my handles! I was so excited about this new found skill that when I got back to the hotel I braided two handles, took the cleats off my tool chest, grabbed my carcass saw and bench hook and with the bench hook on the hotel dresser, sawed the backside of the cleats open to accept my new handles. First time I'd done woodworking in a Super 8 and I'm sure the maids were wondering what all the saw dust was from. Termites?
Oh, back to class. After lunch we moved on to half blind dovetails. I'd never really done these before and was thrilled when they turned out not half bad.
Next was mortise and tenons. We laid out and sawed the tenons first and then used a marking gauge and the tenons to lay out the mortises. This was also a first for me and gave me a chance to try out my new Ray Iles mortice chisels. Boy are those a dream to work with! I'm gonna have to look for excuses to do more mortice and tenon work.
I'm really glad I took this class. I learned a lot, gained a lot of confidence and had a GREAT time. I can't wait to go back and take other classes. Just wish he was closer. I'll do a write up on the advanced dovetail class here in the next few days.
Oh yeah, they have an amazing tool store upstairs also. If you love old vintage tools like I do, this alone is almost worth the trip. Great prices too.
Tuesday, May 31, 2011

It's here! It's here!


This was in my mailbox when I got home today.


Opened the box and saw this.


My long anticipated copy of Chris Schwarz new book The Anarchist Tool Chest. Can't wait to delve into this one!