Saturday, August 20, 2011

Something Completely Different


Cool fall weather makes me think of two things, being able to work in the shop without sweating and football. Specifically fantasy football. I'm in three leagues again this year and am defending champ in my big money league. Our draft is tonight and I wanted to add a little something in addition to the cash prize, a trophy to be presented to the champion of the league for him to hold for the year. This is what I came up with. Not exactly original, but pretty cool I think. It's based on the Lombardi trophy, given to the NFL Super Bowl Champ. My version is, not surprisingly, made of wood. It started out as 4 pieces of construction grade yellow pine 2 x 6's laminated together for the base and 4 pieces of construction grade 2 x 6 mystery wood from my local Lowes laminated together for the football shaped object on top. Once the laminations dried, the base was laid out as a tapering triangle shaped obelisk type thing and sawn to shape with a 5 point rip saw. The football was laid out on all four sides and then sawn, chopped and finally sanded to shape. I had illusions of doing this entire project with hand tools but soon found out that was beyond my skill range. There was a LOT of work on the belt sander required to get that thing into football shape. The other tough thing was getting the top of the base scooped out so that it cradled the football without having major gappage in that connection. I did this with a variety of carving tools, scooping and fitting and scooping and fitting and scoop..........well, you get the idea. A time consuming process to say the least. Once the two pieces were glued together and the glue dried, I did some final sanding and then sprayed the whole thing with a couple coats of a copper color "hammered" paint. This gave it a pretty cool finish.


I learned a lot from this project. Number one, I don't miss using power tools. The shop was in a fog the whole time I was sanding the football to shape and when all was said and done everything in the shop was covered in a layer of saw dust. Number two, southern yellow pine has got to be one of the worst woods to carve. Those rings of resin are incredibly hard. And finally, I learned that this will be the ONLY Lombardi trophy I ever make. :) What a PITA it was. But now that it's all done, I'm glad I made it. And knowing how much work went into this damn thing will give me that much more incentive to win the league and hold on to the trophy for another year. Wish me luck in the draft!


Monday, August 15, 2011

Some exciting news if you like old tools (At least I'm excited)

As you know if you've read my last few blog entries, I have quite an affection for the book The Tool Chest of Benjamin Seaton. I've had my copy for about 4 years now, having bought it at Colonial Williamsburg's Working Wood in the 18th Century conference. The DeWitt-Wallace Museum bookstore had acquired copies to sell in conjunction with that years topic; Tools, Tool Chest and Workbenches. I bought a copy for $24. Quite a bargain I thought at the time. Even more so now, as I just checked Amazon, who has 5 used copies available from $148 to $270. I wouldn't even sell my copy for that price.

I give you that background to tell you this. The Tools and Trades History Society, who published the book in 1994, states on their web site that "A new enlarged edition of The Tool Chest of Benjamin Seaton is due for publication in the autumn of 2011." This got me pretty excited so I got in touch with the Society through e-mail and tried to get some more information. They don't have a release date as of yet, but hope to release it before Christmas. The gentleman who responded to my e-mail told me that the last he heard, the book was being proof-read. The really good news for me was that he said it would be available to the general public, not just Society members, though he doesn't know yet what the price will be.

I will be anxiously checking their web site daily, like a fat kid waiting for cookies to finish baking. I'm not sure what "enlarged" means; whether it means more content or just actually a bigger size. I'm betting on the former, but either way, you can bet that it'll be on the top of my Christmas wish list.

P.S. I apologize if I offended any cookie loving fat kids. I love cookies too! I've just been blessed with a speedy metabolism. ;)

Wednesday, August 10, 2011

18th Century Style Chisels: First Two Complete


Just finished my first 2 chisels in what I hope will eventually grow to a set of 8 to 10. As I mentioned in a previous post, I am basing these chisels on the firmer chisels in the Benjamin Seaton Chest. These first two are a 1" and a 3/4" chisel. Both chisels have pretty much identical measurements aside from the width. The blades are 3 3/4" from tip to shoulder, and 6" to the bolster. They taper from about a shy 3/16" at the bolster to a very thin 1/16" at the start of the cannel. According to the book, The Tool Chest of Benjamin Seaton, bevel edge chisels were did not show up on the Sheffield list until 1870. That is why these chisels taper so thin at the tip. This style chisel was made for trimming dovetail sockets and delicate work, while thicker firmers were used for heavier work. Just to give you an idea of how certain tools are for certain specific jobs, there were 61 chisels and gouges listed in the Seaton Chest inventory. Quite a collection by modern standards.

The beech handles are 5 1/2" long, 1 1/4" wide, and 1" thick at the end, tapering down to be flush with the bolster. These measurements, as well as the measurements of the steel, are the same as these size chisels in the Seaton Chest. The corners are knocked off to create an octagonal shape to the handle that is both traditional as well as very comfortable. The handles is finished with multiple coats of Formby's Tung Oil. They feel really good in the hand.

As these will be used mostly for paring and not receive a lot of heavy beating, I sharpened these to a 20* bevel. Though not as sturdy as a typical 25* bevel, the lower angle makes for a sharper edge. Both these chisels sharpened up very nicely and are extremely sharp. Time will tell how the edges hold up.

These chisels turned out just as I'd hoped aesthetically. I really like the look of the beech handles. Very traditional, at least for English tools. I hope to get a chance to put them to wood this weekend and see how they preform. I'll let you know.

Thanks to George Wilson, Mike Siemsen, Dean Jansa, and Bob Rozaieski for their advice on tapering and heat treating the steel.


A picture to show the difference between a modern premium chisel and the style in the Seaton Chest.

Trying Out The New Forge


I'd gotten 2 chisel blanks ready for heat treating so it was time to give my new forge a try. I waited til dark and set everything up in the driveway outside the garage at the request of my wife. I tried to tell her I'd never blown up a house before, but I think she felt better with things outside. :) I was using MAP gas, which burns hotter than propane, with a plumber type torch tip. I got everything set up how I wanted it, turned on the torch and waited. And waited. And waited some more. After 20 minutes, it was pretty clear this wasn't working like it was supposed to. I decided the trouble might be the tip. After a little internet research, I went and picked up a new tip with a swirling flame that claimed to burn much hotter. What a difference. Within 3 to 4 minutes the inside of the forge was glowing red. I put the 1" chisel blank in the forge, turning it a few times, and within a few minutes, the blank was glowing a nice, bright orange color. I checked it with a magnet and it was non-magnetic for about 2 1/2" up from the bevel end. Plenty high enough so I stuck it back in the forge just long enough to get back the heat I'd lost checking it and then quenched it in oil. Cleaned the black of the blank and stuck it in the toaster oven at 375 for an hour and then turned my attention to the 3/4" blank. Same satisfying results. Very quick to get up to temp. I'd read somewhere that some people temper the blades for an hour or so, let them cool, then bring them back up the that 375 temp again for an hour. Not sure if this does any better than tempering once or not, but I did it anyway. When they were done in the oven, you could clearly see the nice straw color that came up 2" to 2 1/2" from the end.
I'm really happy with the way the forge preformed once I switched to the swirling flame tip. Once I get these two chisels cleaned up, sharpened, and handled, I'll try to get a few more blanks knocked out. I believe I have enough O-1 left for a 5/8" and 1/4" or a 1/2" and a 3/8". I feel pretty good about my heat treating set-up now. It's not the prettiest thing, but it does the job.


I think I scared the chisels into submission when I showed them what they were going to get if they didn't act right in the forge. A 500,000 BTU flame thrower, err, weed torch. Lucky for them it didn't come to that. I think my wife was thankful also. :)


Monday, August 8, 2011

Home Made, Low Tech "Forge"


With this little chisel making project I've got going on, I thought that I should figure out a little better system of heat treating O-1 tool steel than just laying the steel on some fire bricks and holding a propane torch over it. I was able to heat treat my striking knives on a bed of charcoal, but that wasn't really ideal either. I did some internet research and found what looked to be the easiest, most economical solution to be a "paint can forge". I bought a new 1 gallon paint can from Lowes, and found the insulation and refractory cement at a wood stove store. I used a propane bottle to form the insulation around. Once that was packed in tight, I pulled the propane bottle out ( very important step :) ) and drilled a 1" hole for the flame to enter the forge. Then I slathered on a coat of refractory cement, let that dry, and applied a second coat, making sure to coat the opening for the flame also. Apparently this insulation is pretty nasty stuff and you don't want any of it exposed to flame. Next step; try her out and see if she works.

Monday, August 1, 2011

Making 18th Century Style Firmer Chisels: Getting Started

For a long time now, ever since I attended Colonial Willaimsburg's 18th Century Woodworking Symposium on the Tool Chest of Benjamin Seaton, and purchased the book by the same name, I have been fascinated by the beautiful tools inside that chest.
The chest was built in 1797 by a young Benjamin Seaton to house an extensive set of woodworking tools that his father purchased for him from Christopher Gabriel & Sons in London, England for his 21st birthday. What a birthday present! It was an impressive collection, featuring bench planes, moulding planes, 16 pairs of hollows and rounds, saws, chisels, gouges, and much, much more. After building the chest, Benjamin apparently, for whatever reason, never put the tools to work. He made a detailed inventory of the tools in the chest, and that inventory, along with a chest full of tools, is probably the most complete and pristine example of an 18th century cabinet makers inventory available to us.
What intrigued me most were the beautiful saws and the chisels. The chisels were unlike any available on the market today. Long, graceful looking chisels with square sides known as firmer chisels, not the bevel edged designs, tapering on their sides to almost nothing, that are so popular today. Since the day I saw the pictures of these chisels in the book, I've wanted some. To see how they work and just because I love the beauty of them. I can't find chisels like these, and if I could, I'm sure I couldn't afford them. So I decided to try to make a few.
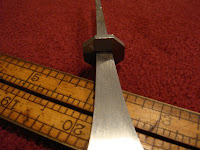
Time for a little detective work. The book, The Tool Chest of Benjamin Seaton, written and published by The Tool and Trades History Society in England, has some wonderful pictures and just enough measurements scattered throughout that with a pair of dividers and a rule, you can pretty much figure out the sizes of the chisels. I'm starting with the 1" chisel. I purchased a length of 1" wide, 3/16" thick O-1 tool steel from McMaster-Carr for the blades and some 1/8" O-1 for the bolsters. After figuring out the measurements from the book and sketching the design on paper, I laid blue painters tape on the 3/16" steel and laid out the chisel shape on that. I cut as close as I could to the line with a hack saw and fine tuned the shape with files. The blade is 3 3/4" to the shoulder and 6" to the bolster. According to the book, the 1" chisel is 1/16" thick at the start of the bevel and 3/16" at the shoulder. Pretty darn thin. To achieve this tapered blade, I turned to my bench-top belt sander with a 40 grit belt and ground the taper by eye, quenching in water often to keep the steel cool and checking the thickness with my dial calipers. I ended up with .0625 (1/16") at what will be the bevel end and .155 (just shy of 5/32) at the shoulder. I'm very pleased with the way this turned out. For the bolster, I drilled a hole in the 1/8" O-1 and then filed the hole square and with a little taper to slide into place down the tang and lock in place due to the flare of the blade. The bolster will eventually prevent the handle from pushing down to far form hand or mallet pressure. I filed the bolster to an octagonal shape and tapered the thickness out from the hole. Looks pretty good and will serve it's purpose.
So far so good. Next step is to heat treat. With the end being so thin, I don't dare try to establish the bevel prior to heat treating for fear of the steel warping. Stay tuned and keep your fingers crossed for me. I've never heat treated anything so thin.